When I set up my sewing room, I placed a pegboard on the wall to store the most used tools while keeping them at hand. This worked for a while, but as expected, over time I acquired more tools and the space began to be scarce. Furthermore, to get to the tools that were at the top of the board I had to get up, and if that wasn't a problem before, now that I have to keep my foot up, it is. So I decided to make an organizer to fill the wall space between the table and the board.

Looking around the house to see if there was anything I could use as a rod, I found a mop handle with the right size, 1.20 m. To pass the mop handle through the organizer's tunnel it would have to be at least 4 cm, but to play it safe I used the measurement of 5 cm. Thus, the useful height of the organizer is 42 - 5 cm = 37 cm, this is the space available to place the pockets in the organizer.
The next step was to prepare a paper with the useful size of the organizer (37 cm x 120 cm) and arrange the tools I wanted to organize on it. I placed and changed the arrangement until I was satisfied with the result, then I drew the pockets on the paper.

I started by opening the pants legs at the crotch, the open leg measured around 50 cm, that is, it was large enough to cover the available height of the wall, as for the width, one leg was not enough, I used as much as I could of a leg and the rest I cut from the other. I tried to make the most of the fabric to have enough fabric to make the pockets, because I wanted to make the entire organizer with the same fabric.
I took advantage of the hem that was already made to save work and joined the two pieces of fabric to create the base of the organizer. Something I should have done before was finishing the edges of the joined fabric before sewing it together, but I only remembered that later. To finish, I topstitched the edges of the fabric to keep it secure.
Because I wanted to place different types of pockets to accommodate objects of different sizes and shapes, I would need several strips of fabric of different sizes. The most complicated pockets were those for boxes and pens, because they were pockets with volume, before cutting the fabric I made prototypes until I realized the right size, when I was satisfied with the result I marked the pockets on the fabric I had available and cut them. It was really tight, and I even had to make one of the pockets with scraps because otherwise I wouldn't have enough fabric, in the end I was left with the waistband and some fabric scraps, I practically used all of the pants. And now that it's hanging up, I even remembered a way to use the waistband too, who knows, maybe I'll do it in the future, especially because usually after some use I will find aspects that can be improved.
My idea for the pockets was to finish the fabric, fold the top 1 cm and topstitch. In the flat pockets I folded a 1 cm margin and sewed it along the edge of the fabric, but in the case of the large pocket this was not possible because as there were three overlapping pockets, with the fold I would have to sew over seven layers of fabric, so I ended up using bias to cover the edges of the large pocket.
The pockets with volume were made to size, for example the ones for the boxes (7 cm wide x 3 cm deep) I marked and folded the following measurements on the fabric for each box: 3 (depth) + 7 (width) + 3 (depth ), as there were 4 boxes, I repeated the marking until I had 4 spaces, in the two spaces at the ends I added 1 cm of margin.
The pen pocket followed the same logic but based on the measurements of the plastic base that was cut from a package, so if a pen broke or leaked ink the organizer will not be stained.
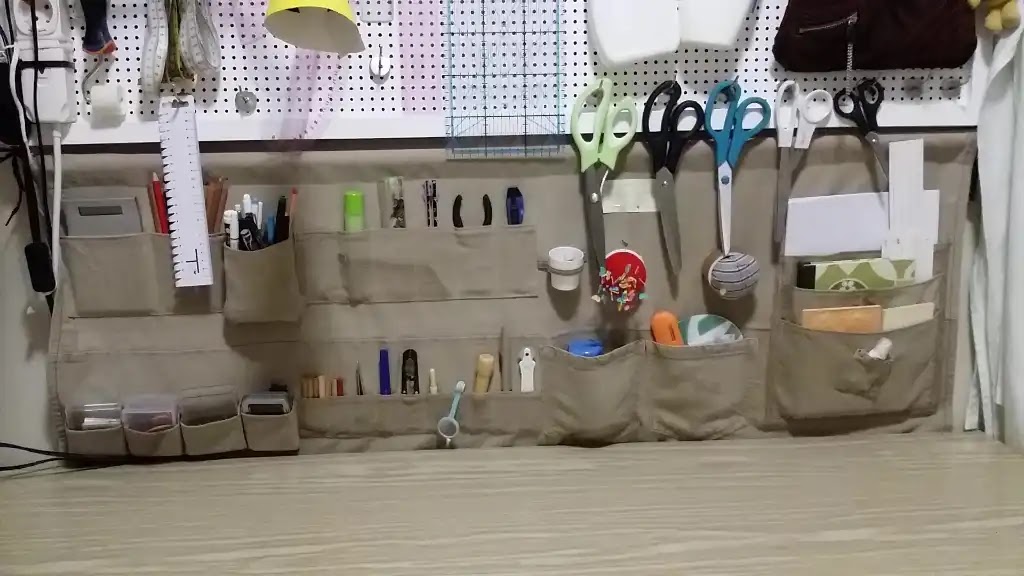
I also added the small trouser pocket over the big pocket, I should have sewn it before making the big pocket, but I only thought about that at the end, and as the pocket was already sewn in it was difficult to attach the small pocket, so much so that only when I was finished I saw that it was crooked, but I thought it looked good, it seemed intentional so I left it alone.
I've been using the organizer to make my life easier, I have everything I need at hand and I no longer need to get up, and as a bonus it also protects the wall from getting dirty, it was worth the work.
No comments:
Post a Comment